חבילות I2P לדביאן
Debian or Ubuntu, All Versions
The Debian packages should work on most platforms running:- Ubuntu (Bionic 18.04 and newer)
- Mint(Tara19) or newer
- Debian Linux (Buster and newer)
- Knoppix
- אפשרות 1: גרסאות עדכניות של אובונטו ושל נגזרותיה (נסו זאת אם אינכם משתמשים בדביאן)
- אפשרות 2: דביאן (כולל נגזרות של דביאן)
Instructions for Ubuntu and derivatives like Linux Mint & Trisquel
הוספת ה־PPA דרך שורת הפקודה והתקנת I2P
-
פתחו מסוף והזינו:
sudo apt-add-repository ppa:i2p-maintainers/i2p
This command will add the PPA to/etc/apt/sources.list.dand fetch the gpg key that the repository has been signed with. The GPG key ensures that the packages have not been tampered with since being built. -
יידעו את מנהל החבילות שלכם על ה־PPA החדש על־ידי הזנת:
sudo apt-get update
פקודה זו רשימת התוכנות העדכנית מכל מאגר המאופשר במערכת שלכם, כולל ה־PPA של I2P שנוסף קודם לכן. - כעת אתם מוכנים להתקנת I2P!
sudo apt-get install i2p
Adding the PPA Using the Software Center
-
Open "Software and Updates" via the applications menu.
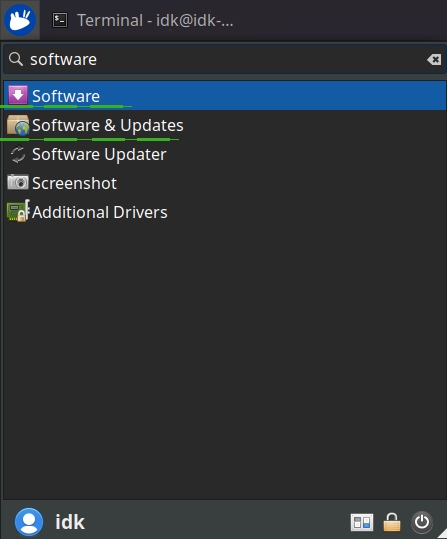
-
Select the "Other Software" tab and click the "Add" button at the
bottom to configure the PPA.
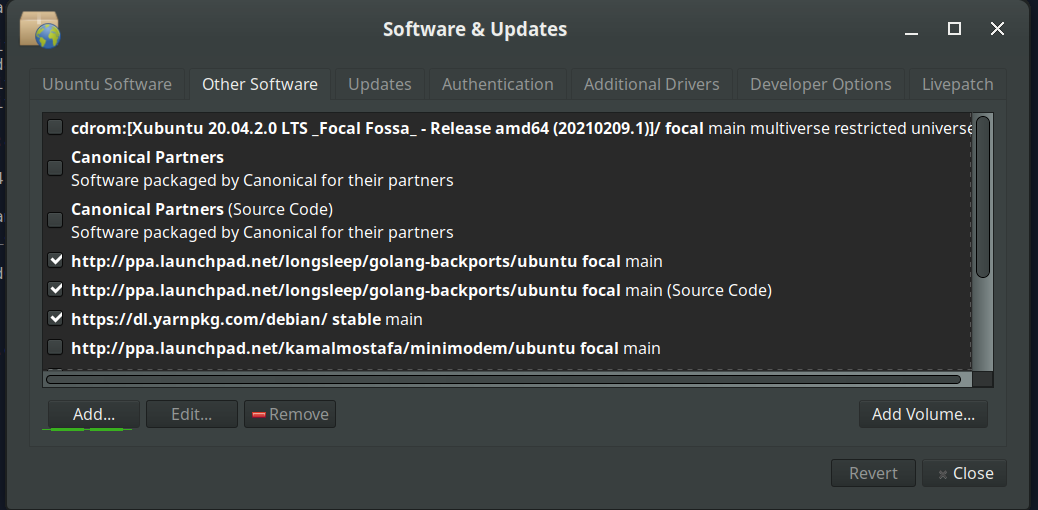
-
Add the PPA by pasting the URL:
ppa:i2p-maintainers/i2pinto the PPA dialog.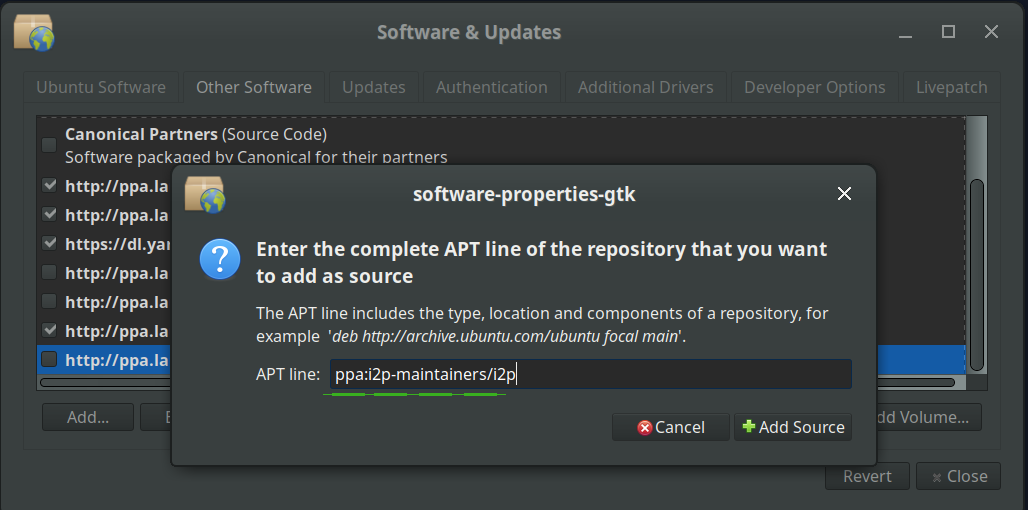
-
Download the repository information with the "Reload" button.
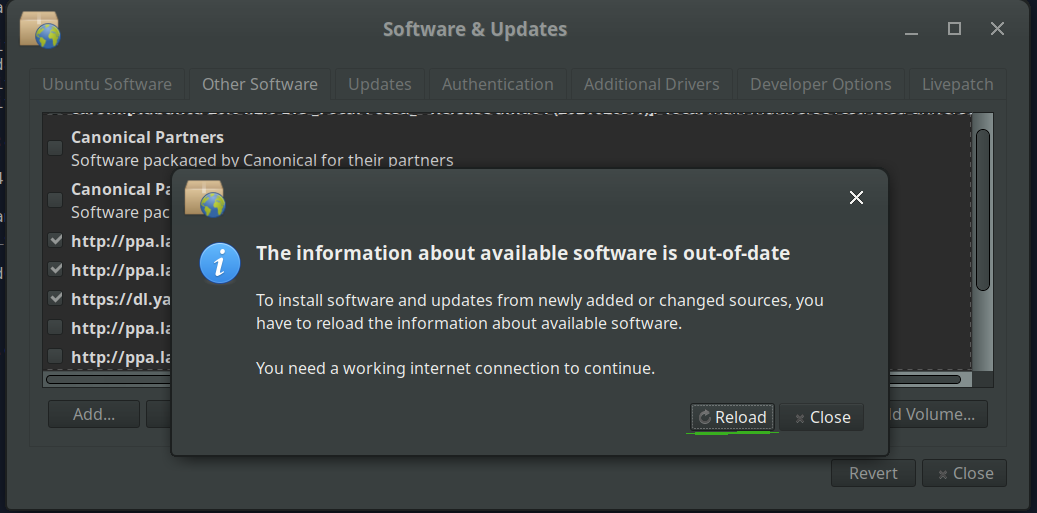
-
Install the I2P software using the "Software" tool from the
applications menu.
הוראות עבור דביאן
NOTICE:
Our old Debian repos deb.i2p2.de and
deb.i2p2.no are EOL.
Please follow these instructions
to update to the new repository, deb.i2p.net.
Note: The steps below should be performed with root access (i.e., switching
user to root with su or by prefixing each command with sudo).
- ,
- Ensure that
apt-transport-https,curl,lsb-releaseare installed.sudo apt-get update sudo apt-get install apt-transport-https lsb-release curl -
Check which version of Debian you are using on this page at the Debian wiki
and verify with
/etc/debian_versionon your system. Then, for Debian Bullseye or newer distributions run the following command to create/etc/apt/sources.list.d/i2p.list.
# Use this command on Debian Bullseye or newer only. echo "deb [signed-by=/usr/share/keyrings/i2p-archive-keyring.gpg] https://deb.i2p.net/ $(lsb_release -sc) main" \ | sudo tee /etc/apt/sources.list.d/i2p.list# Use this command on Debian Downstreams like LMDE or ParrotOS only. echo "deb [signed-by=/usr/share/keyrings/i2p-archive-keyring.gpg] https://deb.i2p.net/ $(dpkg --status tzdata | grep Provides | cut -f2 -d'-') main" \ | sudo tee /etc/apt/sources.list.d/i2p.list# Use this command on Debian Buster or older only. echo "deb https://deb.i2p.net/ $(lsb_release -sc) main" \ | sudo tee /etc/apt/sources.list.d/i2p.list# Use this command on Debian Buster or older only. echo "deb https://deb.i2p.net/ $(dpkg --status tzdata | grep Provides | cut -f2 -d'-') main" \ | sudo tee /etc/apt/sources.list.d/i2p.list - Download the key used to sign the repository:
curl -o i2p-archive-keyring.gpg https://geti2p.net/_static/i2p-archive-keyring.gpg - Display the key fingerprint.
gpg --keyid-format long --import --import-options show-only --with-fingerprint i2p-archive-keyring.gpg7840 E761 0F28 B904 7535 49D7 67EC E560 5BCF 1346 - Copy the keyring to the keyrings directory:
sudo cp i2p-archive-keyring.gpg /usr/share/keyrings/etc/apt/trusted.gpg.d.sudo ln -sf /usr/share/keyrings/i2p-archive-keyring.gpg /etc/apt/trusted.gpg.d/i2p-archive-keyring.gpg -
Notify your package manager of the new repository by entering:
sudo apt-get update - You are now ready to install I2P! Installing the
i2p-keyringpackage will ensure that you receive updates to the repository's GPG key.
sudo apt-get install i2p i2p-keyring
לאחר השלמת תהליך ההתקנה אתם יכולים להמשיך הלאה לשלב הבא, הרצת I2P, ולהגדיר את התצורה של I2P עבור המערכת שלכם.
צעדים לאחר ההתקנה
על־ידי שימוש בחבילות של I2P ניתן להריץ את נתב ה־I2P בשלוש הדרכים הבאות:-
"לפי הצורך" באמצעות התסריט i2prouter. פשוט הריצו "
i2prouter start" בשורת הפקודה. (הערה: אל תריצו כמשתמש root ואל תשתמשו ב־sudo!) -
"לפי הצורך" ללא ה־java service wrapper
(נדרש במערכות שאינן מריצות גנו/לינוקס או שאינן x86) על־ידי הרצת "
i2prouter-nowrapper". (הערה: אל תריצו כמשתמש root ואל תשתמשו ב־sudo!) -
כשירות שרץ באופן עצמאי כאשר המערכת עולה, עוד
לפני שהמשתמש נכנס. ניתן להפעיל את השירות עם "
dpkg-reconfigure i2p" בתור root או על־ידי שימוש ב־sudo. זהו אופן השימוש המומלץ.
בעת ההתקנה בפעם הראשונה, אנא זכרו להגדיר את ה־NAT/חומת האש שלכם אם אתם יכולים. ניתן למצוא את הפתחות שיש להעביר ב עמוד הגדרות הרשת בממשק הנתב. אם אתם זקוקים להדרכה כיצד להעביר פתחות, portforward.com יכול לעזור.
אנא בדקו את הגדרות רוחב־הפס בעמוד הגדרות התצורה, מאחר והגדרות ברירת המחדל (96 ק"ב/שניה בהורדה ו־40 ק"ב/שניה בהעלאה) די נמוכות.
If you want to reach I2P Sites via your browser, have a look on the browser proxy setup page for an easy howto.


