Muncă post-instalare
După rularea instalatorului pe Windows, pur și simplu faceți click pe butonul "Start I2P" care vă va aduce la router console, unde veți găsi instrucțiuni suplimentare.
Pe sistemele Unix-like, I2P poate fi pornit ca un serviciu de sistem folosind scriptul "i2prouter", situat în directorul selectat pentru I2P. Schimbați la acest director într-o consolă de comandă și tastați "sh i2prouter status" această comandă ar trebui să vă spună statutul router-ului. Argumentele "start", "stop" și "restart" controlează serviciul. router console poate fi accesat prin metoda obisnuită. Pentru utilizatorii de OpenSolaris dar și de alte sisteme pentru care nu este suportat wrapper-ul (i2psvc), porniți router-ul prin comanda "sh runplain.sh".
Când instalați pentru prima dată, vă rugăm să nu uitați să ajustați NAT-ul/ firewall-ul dvs dacă reusiti, ținând cont de porturile Internet pe care le utilizează I2P, descris aici printre alte porturi. Dacă ați deschis cu succes portul de intrare TCP, permiteti, de asemenea, TCP de intrare pe pagina de configurare.
De asemenea, vă rugăm să examinați și să ajustați setările de lățime de bandăpe pagina de configurare, deoarece setările implicite de descărcare de 96 KBps / și de încărcare de 40 KBps sunt destul de lente.
If you want to reach I2P Sites via your browser, have a look on the browser proxy setup page for an easy howto.
A web browser will need to be configured to access sites and services on the I2P network, and to utilize outproxies. Below are walkthroughs for some of the most popular browsers.
Profil Firefox pentru Windows
If you are using Windows, the recommended way of accessing the I2P network is using the Firefox profile.
If you used the Easy-Install bundle, the Firefox profile is included and you can skip this page.
If you do not wish to use that profile or are not on Windows, you will need to configure a browser.
How To Configure Your Browser
Firefox
Extension-based Configuration: I2P in Private Browsing
A new way of automatically configuring the I2P Browser is currently being tested. It uses the Firefox's "Container Tabs" to build private browsing tools for use with I2P and I2P applications.
It does pre-configuration of your browser by enabling some of the privacy Browser Settings like ResistFingerprinting, and enforces WebRTC proxy obedience. It also contains menus, shortcuts, and monitoring tools improving Firefox's integration with I2P. It should not substantially interfere with your non-I2P Firefox tabs.
The extension, I2P in Private Browsing, can be obtained from the Mozilla addon store.
The source code for the extension is available at i2pgit.org.
Instrucțiuni pentru Firefox 57 și versiuni superioare:
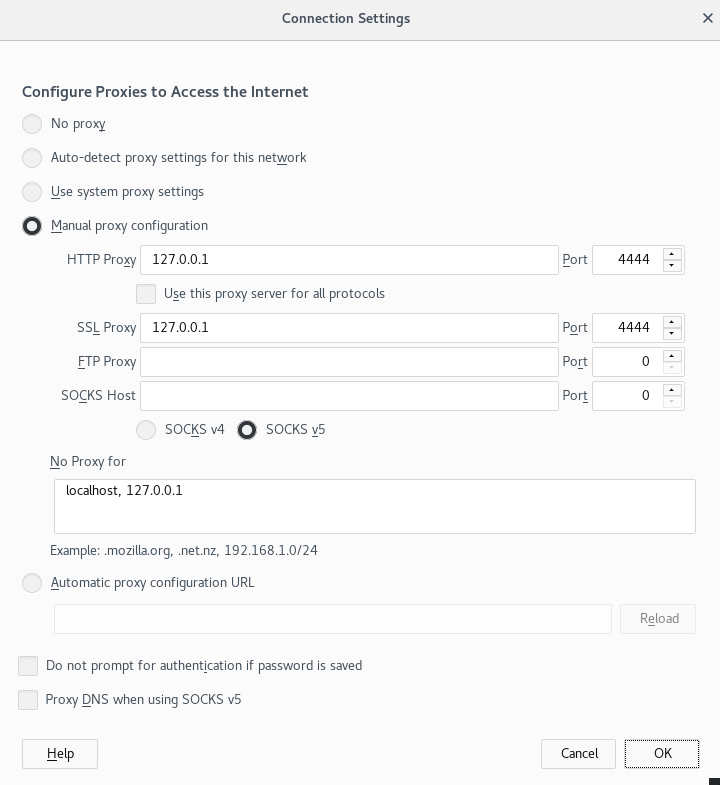
From the Menu button in the top right, select Preferences. Scroll down until you see the Network Proxy section, as shown in the screenshot below. Click on Settings

In the Connection Settings pop-up, select Manual proxy
configuration. Set both the HTTP and SSL Proxy to address
127.0.0.1 with port 4444 as shown in the following screenshot.
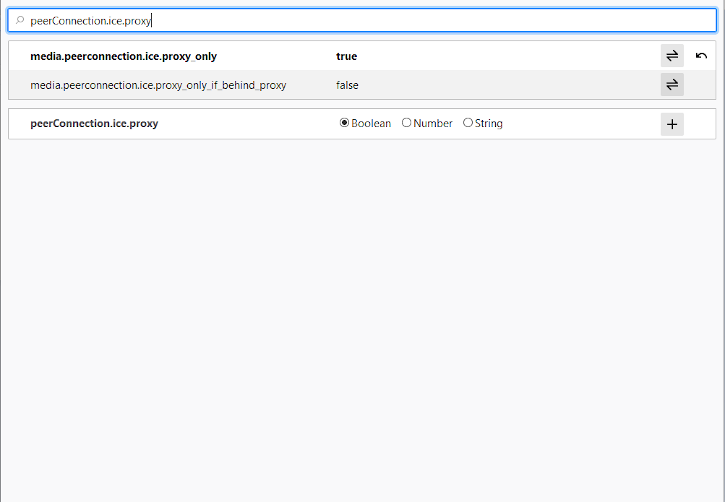
Finally, go to the address about:config and find the property media.peerConnection.ice.proxy_only. Ensure that this setting is True. Now find the property keyword.enabled, and set it to False.
Chrome
Extension-based Configuration: I2PChrome.js(Experimental, additional configuration)
An experimental, partially-automated configuration process for Chrome is available. In order to configure it, create a new Profile especially for your I2P browsing, separate from the default profile. Then install this Extension in your newly-created profile. This profile is now configured to use I2P. Highly detailed instructions are available at the homepage.
All Chrome Versions
Chromium-Based Browsers like Chrome have slightly different places for their proxy settings depending on variant and platform. These instructions may be slightly different in Brave or Iridium, for instance. From the Main menu, navigate to the Settings, and search for the menu item. Clicking it will open the right settings for your platform.
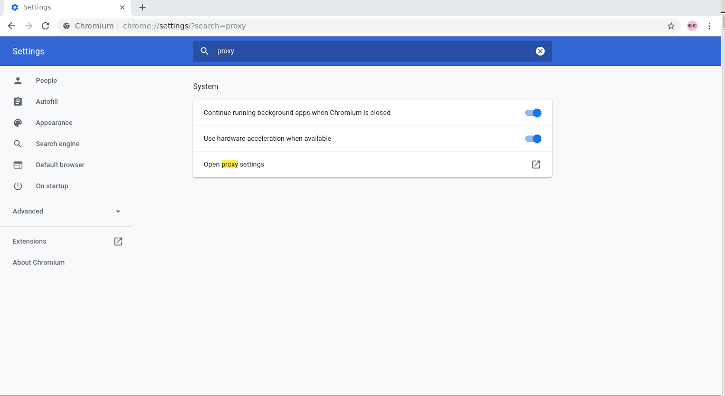
On Windows, this button will launch you into the shared proxy settings used by Internet Explorer, and you can configure it by following the Internet Explorer 8 guide.
IceRaven and other Firefoxes for Android
Extension-based Configuration
Modern Firefoxes(The "Fenix" based Firefoxes) do not generally have an about:config page for you to configure proxy settings manually. It is further not possible to use most extensions in Fenix-based Firefoxes. It is possible to enable support about:config and enable more extensions in Firefox Nightly at the time of this writing, but it's a manual and difficult process. IceRaven is a fork of Firefox which enables a collection of extensions while Mozilla and the Mozilla Community work on adding support for extensions to Firefox for Android. It provides the easiest way of configuring a modern Firefox-based Browser for Android. It does not come from Mozilla and carries no guarantees from them. Installing the extension in IceRaven will proxy all your IceRaven browsing over I2P.
If you have not installed IceRaven yet, go to the next step. If you have been using IceRaven for a while, go to the main menu, select the History tab, and make sure that you have cleared information about your past browsing by tapping the "Delete History" button.
Open the IceRaven main menu, and scroll to the top until you see the "Add-Ons" submenu. Tap the "Add-Ons Manager" option in the "Add-Ons" submenu. Install the extension named I2P Proxy for Android and other Systems.
Your IceRaven browser is now configured to use I2P.
This extension also works in pre-Fenix(Pre-Firefox-68) Firefox based web browsers, if installed from the following addons.mozilla.org URL. I2P Proxy for Android and Other Systems
This extension is identical to the Chromium extension and is built from the same source.
In order to enable extension support in Firefox Nightly, you should follow the steps provided by Mozilla on their Blog
Internet Explorer
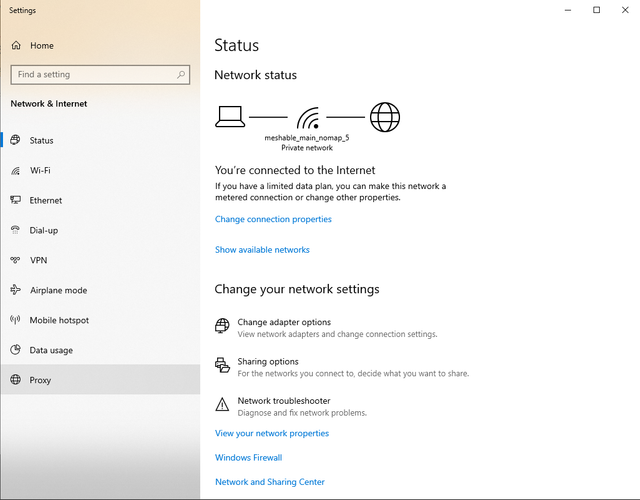
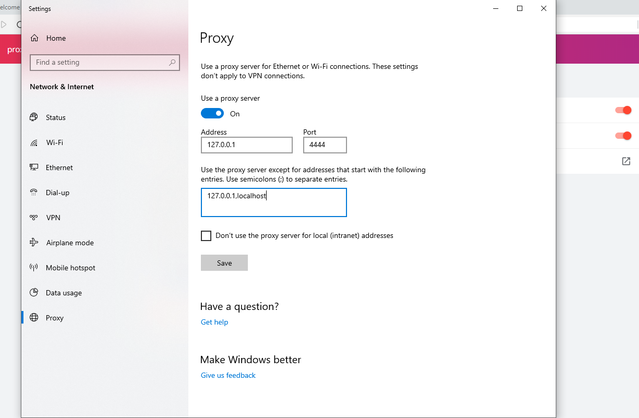
In the start menu search for the the "Network and Internet Settings" to open the settings. The last entry in the menu is the Proxy Settings, click it to your proxy to connect to I2P.
Now set the checkmark at "use a proxy server for your LAN" and at the "Bypass proxy server for local addresses". With a click on Advanced-button you open the window to open the ports. Enter the values like on the picture, IP 127.0.0.1 and port 4444 for HTTP, port 4445 for HTTPS. With clicks on OK you save the settings and your browser is set to use the I2P proxy.
Termeni de furnizare a serviciilor
The I2P network is a peer-to-peer overlay network. Proxying to the clearnet is not part of its design or function with regards to its communication protecting network features.
The I2P Project itself does not run any proxies to the Internet. The I2P software includes a default outproxy: exit.stormycloud.i2p. These are run by StormyCloud Inc.
https://stormycloud.orgBy default, I2P comes with one outproxy configured: exit.stormycloud.i2p.
I2P Sites that are accessible via .i2p addresses are also not allowed via the outproxies.
Tor provides a browser to use as an outproxy to the Internet.


